Showing posts with label Camping Tips. Show all posts

Thursday, April 27, 2017

Glamping with Mary Jane Review

Glamping :)  Glamping with Mary Jane by Mary Jane Butters

At first glance this book looks like a cross between a pin-up poster review and a vintage R.V. advertisement.  Glamour camping has much more to offer as a concept, though.  We sell lightweight gear and canoes for the Boundary Waters and Beyond.  Our bookstore is eclectic!! Our philosophy is not a purist exclusive.  We figure, if "IT" gets you into the woods, then IT is a good thing.  Isn't IT?


Mary Jane Butters has an affinity for the vintage paired with modern sensibilities.  As an antique collector and dealer, I can certainly appreciate her point of view.  She begins with a short history of women in the outdoors and jumps right into trailer shopping and restoration.  M.J. makes it clear that research and more research is key to acquiring and outfitting a new mobile version of your home away from wherever you used to have to be to lay your head on your pillow at night.


Tenting, outdoor bathing, adjusting to small spaces, decorating, ideas, lifestyle, gear, tool kits, safety, maps and more are the waypoints in this GPS of a camping book.  Inevitably leading to some fabulous recipes, which is, lets face it, is the key to what most of us think about when camping or Glamping... Good Food.

And... how to cook it over a campfire.


Activities follow, including Junktiquing and other distractions and excuses to hit the road.  Who doesn't want to reclaim some items from the past and give them your own flair and flavor n'route to the next International Glamping Weekend?


You might find yourself wondering why this book is on our list and so I'll repeat myself.  If reading it gets you outside and sleeping under the stars then you are one step closer to braving the wilds of the Boundary Waters.  And... one step closer to a visit to the Canoe Capital of the World... Ely, Minnesota.  Besides that, I like the restoration of old things, even trailers, and, I like the restoration of some old ways of thinking.

Namely that camping can be an eventful lifestyle - a celebration - at all levels instead of a difficult endurance exercise.  Roughing IT has its place, but being comfortable and happy outdoors is never overrated.

One more thing.  The book is fun.

Tim Stouffer
the Boundary Waters Catalog


Tuesday, January 7, 2014

Blog 62: How to Sharpen a Knife

BLOG 62. HOW TO SHARPEN A KNIFE
By Cliff Jacobson


It’s easy to sharpen a knife.  All you need is a whet-stone, some honing oil and practice.  You can use a diamond stone or a natural stone.  No matter: any good sharpening stone will work if you do your part. Indeed, South American natives sharpen their machetes on the side-walk and they obtain a very sharp edge! This method works with any non-serrated blade:

FIRST, SOME RULES
           
1.  Electric and mechanical sharpeners will provide a good working edge but not a wickedly sharp one.  If you want a razor-sharp edge, use a whet-stone!  
           
2.  Don't ever use a grindstone on a good knife!  You’ll destroy the edge and the temper.Those handy "pull-through" sharpeners designed for kitchen knives will produce a quick working edge, but not a super-sharp, polished edge you can be proud of.
           
3.  To obtain a fast "working" edge on a dull knife, begin sharpening with a coarse diamond stone or coarse Carborundum or aluminum oxide stone (available at hardware stores).  A fine-toothed file can be used to remove deep nicks in an abused blade or, to re-form a blade that has a broken tip.
           
4.  Once the edge takes shape, change to a medium grit "soft Arkansas" or "Wachita" stone.  Keep the stone well-lubricated with cutting oil, WD-40, or kerosene.  Do not  use automotive or gun oils! 

5. Diamond stones come in coarse, medium and fine. A coarse stone will take off metal real fast--ideal to set the edge of a new knife.  But once the edge is "set" you'll probably never again use the coarse stone.  Sharpness will be easy to maintain with a "fine" stone.  The point is that you will get far more use out of a medium and fine abrasive stone than a coarse one.  If you want to save money, buy a coarse carborundum stone (hardware store) and use it for tough sharpening jobs. When the nicks are gone, go to a medium grit diamond stone. Finish on a fine Arkansas oil stone. A fine oil stone will produce a highly polished, razor edge.
           
6.  Sharpening will go easier if you dip the cold blade into boiling water for a few seconds before you begin to hone.
From: Camping's Top Secrets, by Cliff Jacobson. For most camp chores--cooking, whittling, etc., a 15 degree angle is best. Twenty degrees is better for knives that will be used hard (cutting into bone, heavy gristle, etc.)

PROCEDURE
Maintain a film of light oil (natural stones) or water (diamond/carborundum, and aluminum oxide stones) to float away the steel particles that clog the pores of the stone and reduce its cutting efficiency.  Every few dozen strokes, dry the stone and blade and apply new oil. Yes, you will go through a lot of oil this way, but you won't dull the edge by grinding metal shavings into it.  Frequent cleaning is essential if you want a super-sharp edge! You don’t need to use a special cutting oil—WD-40 works fine.
 
The "penny angle" trick works only with a narrow blade like that on a Swiss Army Knife.
Keep the back of the blade raised 10-20 degrees and cut into  the stone as you sharpen. If you have a Swiss Army knife, you can approximate the correct angle if you rest the back of the blade on two stacked pennies (photo 1).  Another trick is to set the blade flat on the stone and adjust a bright light directly overhead. Slowly raise the back of the blade until you can just see a shadow.  If you want a whisker-sharp edge for slicing food, use a shallow (about 10 degrees) angle. For more rugged work, 15-20 degrees is best. You MUST maintain the precise angle as you sharpen. Most people need about 30 minutes of hands-on sharpening practice to build the muscle memory needed to hold a consistent angle. You MUST maintain a consistent angle or your knife will never get sharp!

You can buy special tools that maintain the recommended angle as you sharpen.  These tools clamp to the knife blade.  They work well on the body of the blade but not on a sharply curved tip.  If you learn to hold a consistent angle by hand (it just takes practice) you'll never use a clamp.
           
This is a medium grit Arkansas stone. Generally, carbon steel blades like this old Case knife, will take a faster and keener edge than stainless.  
Take about six strokes per side on the stone. Keep the stone flooded with lubricant.  If you want a razor’s edge, switch to a fine-grained stone (natural or diamond), then finish by stropping the blade on a leather belt. Strop the edge away from the leather, not towards it as  when using a hone.

CHECK FOR SHARPNESS
            There are many ways to check blade sharpness.  Here are a few:
  1. A razor sharp knife will shave hair from the back of your hand.
  2. Shine a bright light on the sharpened edge. A dull edge will reflect light.
  3. Drag your thumb nail lightly across the blade.  The blade should scrape the nail cleanly, without chattering.
  4. A razor-sharp knife will cleanly slice typing paper.
           
Note:  A sharpening (butcher's) steel will not sharpen a knife. A steel is simply a coarse version of a leather strop. It’s for touching up a well-used blade but it won’t take the place of a whetstone.

Cliff Jacobson
www.cliff-jacobson.com

XXX


Sunday, January 5, 2014

BLOG 61. How To Pick a Good Camping Knife

BLOG 61. HOW TO PICK A GOOD CAMPING KNIFE
By Cliff Jacobson
Clockwise from the top: Grohman #1 flat-ground carbon "Camper"; Gerber Shorty/carbon steel (no longer made);
Victorinox "Forester"; Forschner (Victorinox) #40614; Mora carbon; Old Hickory carbon paring knife; Idaho Knife Works "Cliff Knife" (carbon).  
What do you think is the most important tool to have along on a canoe camping trip? If you said a good sharp knife, you’re in agreement with the experts. But few of today’s knives are sharp, let alone ideal for camping. The best-sellers have thick blades that are better for cutting through car doors than slicing salami and pine!  

A camp knife should be thin-bladed, lightweight and compact. Edge retention is a factor only if you seldom sharpen your knife.  A folding knife is fine, but a fixed blade is more rugged. You can flex the blade or hammer it with a wooden mallet to split kindling and you won’t damage a thing.  And, there’s no folding mechanism that can be gummed up by jam or peanut butter.  But sheath knives can be dangerous, not because their blades don’t close, but because the sheath’s that generally come with them are too thin and flimsy.  If you choose a fixed-blade knife, make your own heavy-duty riveted sheath (my book, “Camping’s Top Secrets”/25th Anniversary Edition, shows how).
Make your own knife sheath.  This project took about an hour. Cost of materials, about $15
MY PREFERENCE


  1.       Four to four and-one-half inches is an ideal blade length.  Shorter won’t reach to the bottom of the peanut butter jar; longer is necessary only for filleting fish.
  2.       Maximum blade thickness is one-eighth inch, and thinner is better, much better! Try cutting paper-thin slices from a tomato with a thick-bladed knife and you’ll see why! 
  3.       Knives with serrated edges are good only for cutting seat belts and rope.  And you need a special hone to sharpen them. 
  4.       Carbon steel is easier to sharpen than stainless steel and it tends to take a keener edge.  High-end (expensive!) stainless alloys are excellent. Cheap stainless is awful!
  5.       A narrow, straight blade with a central point is best for peeling spuds, slicing vegetables and general camp work.
  6.       A flat-ground blade provides truer slicing and is best for all-round use.  A Scandinavian (Scandi) grind, like those found on Mora knives works well for whittling and splitting. Hollow-ground blades are easier to sharpen to a razor's edge than flat-ground or Scandi blades but they aren't as strong. 
  7.       Avoid knives that have a long unsharpened area near the handle; a dull spot here shortens the cutting edge and reduces cutting leverage near your hand.
  8.       A beefy, hand-filling handle provides more control and better leverage than a short, thin handle.
  9.       If you want a rugged fixed-blade knife, one that will withstand frequent flexing, choose a model whose blade runs the full length of the handle.
You can buy a good knife for under 25 dollars. American made pocket knives (with one or two blades), genuine Swiss Army knives (Victorinox and Wenger), and the Official Boy Scout pocket knife are best buys. If you want an inexpensive sheath knife, Canadian survival expert, Mors Kochanski recommends the carbon steel Swedish Mora knife (shown above).  It comes with a rugged Scandinavian style sheath and costs under 15 dollars.  It's not pretty, but it is efficient and it comes from the factory sharper than many custom knives.

Next time: How to sharpen your knife to a razor’s edge.

Cliff Jacobson
www.cliff-jacobson


Wednesday, October 2, 2013

BLOG 55. Tent Stakes and Lines Make a Difference


BLOG 55. Tent Stakes and Lines Make a Difference
by Cliff Jacobson
Chasing a dome tent that "blew away". English River, Ontario 
When we canoed the Hood River (Nunavut, Canada) in 1984, an Arctic storm with winds of 60 mph (so said our wind-gauge), kept us confined to our tents for three days.  I remember trying to walk in that wind.  I couldn’t.  There was no way I could fall down if I leaned into the wind.

When, the wind finally subsided we emerged from our tents (Cannondale Aroostooks) and surveyed the damage.  Surprisingly, all three tents were still standing.  Not one had pulled a stake, ripped a stitch or broke a zipper.  Much of the credit of course, goes to the brilliant design of the Aroostook tent, but other factors that saved the day were:

1.   At home, before the trip, we added extra storm lines and stake points to our tents.  My books, “Expedition Canoeing and “Camping’s Top Secrets, 25th Anniversary Ed. provide details.


2.  There's no time to cut storm cords when wind looms large, so I carry a dozen pre-cut 15-20 foot long cords.  Each cord is carefully wound and secured with a quick-release loop. A pull on the quick-release end instantly releases the cord.

3.   Tents were set head-end or quartering into the wind.

4.   Windward storm lines and stake points were double-staked as illustrated below.
See more storm-proofing tips in my book, "Camping's Top Secrets, 25th Anniversary ed.

I carry a variety of tent stakes so I'll have options for different types of ground. L to R: 12-inch long arrow-shaft stake,  10-inch staple, 9-inch skewer,  "rock stake", U-pound 'em stake

Note the "bag of cords"--one pull and they're ready to go. The long 12-inch arrow-shaft stakes are my favorite.  Pound these in and they'll never let go!  Available from Cooke Custom Sewing (www.cookecustomsewing.com). Stakes should be at least 8 inches long to provide ample holding power in storms.
The tent stakes you use DO make a difference.  Those short wire “rock stakes” that are popular in the Boundary Waters, are out-of-place on the tundra, in sand and swamp.  The best stakes for soft ground are 12-inch long, hard-tempered aluminum “arrow-shaft” stakes (available from Cooke Custom
Sewing/www.cookecustomsewing.com).  They are expensive and worth it!

Twelve inch aluminum staples (if you can find them) also work well in tundra, sand and soft ground. I bring a variety of stakes on my canoe trips so I’ll have the best one for every type of ground.  My rule is to bring twice as many stakes as my tent needs for routine set-up.  That way, I’ll have extras for storm-proofing, and enough to double-stake windward lines—two stakes per loop, each set at a different angle, doubles the holding power.
A mini-tornado, along the Noatak River, Alaska. The big fly flattened instantly; our storm-proofed tents held securely.
When it comes to camping gear, I have pretty much all I want or need.  But I’m always on the lookout for new and better tent stakes.  The tent stakes you use do make a difference!

Cliff Jacobson
www.cliff-jacobson.com  

Thursday, July 11, 2013

BLOG 49. Compass or GPS?


BLOG 49. COMPASS OR GPS?
by Cliff Jacobson

Compass or GPS?

At the outset I should make it clear that I love my GPS.  I bring it on every canoe trip. This said, I ALWAYS carry a compass—two of them, in fact.  Both are Orienteering models; one (a Suunto MC-2) has a declination device and a balanced needle that remains level anywhere in the world; the other is a basic Boy Scout style model. The Suunto is on a lanyard in my pocket; the backup compass is in a pack.

People are buying GPS’s like mad these days, but precious few know how to use them. Some are so hooked on GPS technology that they leave paper maps at home and rely entirely on the little chip-map in the GPS—a dangerous mistake. After all, batteries can die, electronics can go bad; screens can break etc. And contrary to the claims of manufacturers, a “waterproof” GPS will take on water if it’s submerged for very long.  Equally important is that a GPS screen is too small to permit wide-ranging detail.  Of course, you can pan around to see more area, but you won’t see the “big picture”, which is useful for planning the days ahead.  Enlarging the map scale reduces the viewing area; making it smaller limits detail.  That’s why you need a topographic map that shows the entire route!

A knowledge of map and compass navigation is a must before you commit to GPS.  Why? Because it’s easy to make an error when programming GPS waypoints, especially in UTM (Universal Trans Mercator) mode. Unless your GPS has a detailed built-in topo map (the free North American base map provided with the instrument isn’t good enough), with detail equal to a topographic map, you’ll need to hand plot waypoint coordinates, and it’s much easier and more accurate to do this in UTM mode than in latitude/longitude.  (I’ll detail the UTM system in a future blog, or see my books, “Basic Illustrated Map & Compass” or “Expedition Canoeing”).  Without a working knowledge of map and compass, you’re almost certain to get lost if you make a waypoint plotting error.

Most people who own field model GPS’s have only a rudimentary knowledge of navigation. They know the eight principal compass directions, and that “north” is at the top of a map, but little else.  Declination is a mystery, as are the “three north’s” (true, grid, magnetic). Some think that topographic map gridlines point true north and south, which they seldom do. 
Cliff checks his position with a GPS--along the Snake River, Yukon
My friend, Larry Rice, an author and frequent contributor to canoeing magazines, told me he once went on a wilderness canoe trip in northern Canada which was “guided” by a man who supposedly was very experienced.  The man sent the crew an email stating that to reduce weight and bulk everyone should leave their topo maps and GPS at home.  He said that his GPS contained a detailed map of their entire route, and that’s all they would need.

My friend rolled his eyes at this announcement and of course, brought his own map, compass and GPS.  He said that each day the crew would rally around his topo map to discuss the big picture. The leader’s GPS chip-map was simply too small to show an over-view. Ironically, the “leader” could not always accurately pin-point the crew’s location on Larry’s paper map. I hazard to think what might have happened if Larry had taken the email to heart and the leader had lost or damaged his GPS.

Much as I love my GPS, I find that it’s not all that useful on the small lakes that characterize much of the BWCA.  For this, a map and compass gets me around just fine.

I would encourage all to become proficient with map and compass before they commit to a GPS. That way, programming errors will quickly be identified. I might add that detailed GPS maps are not available for many remote areas.  But paper topo maps cover them all.  Overhanging vegetation, canyon walls or heavy cloud cover can prevent an accurate GPS fix.  And on rare occasions (as in 911!) the system is shut down. Unless you drop your compass off a cliff or run over it with a truck, it will always work! And the information on a topo map can never be corrupted.

Technology is wonderful but it cannot replace skills or common sense. Bad stuff happens when one least expects it.  That’s why I always bring two orienteering style compasses, two sets of maps and a GPS on all my northern canoe adventures.

Cliff Jacobson
www.cliff-jacobson.com

XXX

Sunday, June 16, 2013

BLOG 47. Dehydrating Hamburger and Beans


DEHYDRATING HAMBURGER AND BEANS
by Cliff Jacobson

Hamburger and beans form the basis of dozens of outdoors meals.  Examples include spaghetti, lasagna, beef and been burritos and chili.  Add hamburger and rice or noodles to soup and you have a complete meal.  One of my favorite tripping meals is a mix of Oriental Raman soup, with dried hamburger and shitake mushrooms.  For more flavor and nutrition add one-half a bouillon cube per person, and some dried veggies. 
 
Cliff: making chili with dehydrated hamburger and beans
You can buy dried hamburger from Mountain House and Cache Lake.  The Mountain House product is freeze-dried; Cache Lake’s is dehydrated.  Both are excellent; you can’t taste the difference.  Rehydration takes about ten minutes: start the meat in cold water, bring to a boil, “cover and cozy” for ten minutes then have at it.  Mountain House says their hamburger rehydrates in three minutes.  Maybe; but it’ll be a lot more tender if you give it more time.

Dried hamburger is expensive—around 50 dollars a pound.  But you can dry it at home for the price of the meat.  Here’s how:

-- Buy the leanest hamburger you can find—85 percent lean, minimum.  Ninety or 95 percent is better.
-- Fry the hamburger (like you’re making spaghetti) until it is well browned.  WELL BROWNED!  Don’t worry, you can’t over-cook it.  Under-cooking, however, can be dangerous!
-- When the hamburger is thoroughly browned, and has absolutely no pink color, scoop it into a strainer and pour a full kettle of boiling water over it.  The boiling water will strip out nearly all the fat: fat-degradation is the culprit that causes spoilage.  The meat is now about 99.5 percent lean.
-- Set the temperature of your dehydrator to 140 degrees F or “high”.  Line each tray with three sheets of paper toweling and scoop the burger onto the sheets, using a metal spoon that has been sterilized in boiling water.  One pound of burger per tray is enough. 
-- Dehydrate for 24 hours.
-- Re-package the dried meat in vacuum-sealed plastic bags or Zip-lock bags. Double the bags—a single plastic bag is not reliable enough. I keep the vacuum-sealed meat in the freezer until the day of my trip. Room temperature double vacuum-sealed burger will stay fresh for about six months; frozen, it’ll keep for two years.  Unrefrigerated Zip-locked burger should be used within two weeks.  It is definitely worth buying a vacuum-sealing machine if you want foods to last over the long haul.


DRYING BEANS
Many paddlers bring packaged, dried beans on their canoe trips. They rehydrate the beans in a water-filled poly bottle a day before use.  This works, but it’s time-consuming, heavy, bulky and messy.  I prefer to dehydrate beans and vacuum-seal them in plastic, just like hamburger.

PROCEDURE
-- Buy canned beans at your grocery store.  Pour the beans, with their liquid, into a strainer.  Allow the liquid to drain. Do not pour boiling water through the strainer.
-- Line your dehydrator tray with plastic wrap.  Or (better) use commercial plastic dehydrator liners.
-- Pour one 8 ounce can of beans on each tray.
-- Set your dehydrator temperature at 120 degrees or hotter. Your beans will be dry in 24 hours.  Double vacuum-seal or Zip-lock them and you’re done.  Rehydration takes about ten minutes. 

That’s all there is to it!

PS. You’ll find more cool cooking tips in my book, Basic Illustrated: Cooking in the Outdoors.

Cliff Jacobson
www.cliff-jacobson.com

Wednesday, May 22, 2013

Boundary Waters Fishing Gear List by Piragis Northwoods Company

Boundary Waters Fishing Gear List

We get asked all the time what our choices for fishing trips in the Boundary Waters are. While what goes in a guy's or gal's tackle box can be very personal and lures are highly prized for sentimental and experiential reasons… there are tried and true options that have advantages over others.

There are a "big three" of fish species in the Boundary Waters, four if you include Lake Trout, although they are not as prevalent. Walleye, Northern Pike and Smallmouth Bass can be found throughout the Boundary Waters (BWCA). Panfish such as Black Crappie and Bluegill are common as well. We'll focus on the "big three" for the purpose of this discussion. Please note: All of the items discussed can be purchased in our retail store at the first stoplight in Ely, Minnesota before your trip begins. At Piragis, we don't run out, we keep these staples in stock, in the best color and size combinations.

The first thing you need is a good Medium 2 piece spinning rod and one for back-up. If you want to go with a slightly heavier action on the back-up rod, that is fine. Extra line, pre-spooled is a good idea. The best choice for the BWCA is 8 pound test. We advise you take something 6 to 10 lb. test, nothing lighter unless your passion is ultra-light fishing and then you'll have to adjust a great many of the lure choices that follow accordingly.  We carry an excellent and quite affordable break down pack rod and a case made right here in Ely that fits each piece and rolls up to protect it in your pack. That little detail can allow you to have a rod in your pack without hardly noticing it.

Smallmouth Bass and Northern Pike like surface lures. Frog baits, Mouse baits and floating Rapalas always top these lists. Old standards such as Lucky 13, Tiny Torpedo, Bass-Oreno and the newer Pop-R baits all pull Smallies out of their hiding places. Smallmouth Bass like the durable plastic baits such as Zulus and Zooms and others that mimic dying minnows. These are best rigged simply with a large "worm" hook and retrieved like a wounded minnow would swim.


Crank Baits come in various combinations of diving depth. Rapala has shallow and deep runners, ranging from baits that run three to nine feet deep. These are all good and work while you cast or troll for dinner as you paddle through paradise. Shad Raps, Rattletraps and lures like Crawfish Baits and the Wally Diver are fantastic choices to attract Walleyes. It is a good idea to have a combination of all of these to choose from. Tiny alternatives like countdowns and large and jointed Rapalas give you some great options during the heat of Summer.


We stock and carry non-lead jig heads in 1/8 oz and 1/4 oz in a variety of highly visible colors. These work great with live bait (minnows, leaches, night crawlers) as well as Gulp artificial versions of those three. Jigs work well with Twister Tails in bright colors and black as well. Those combinations are some favorites of Walleyes in the Northwoods.

Daredevle Spoons in silver, gold and the old standby, red and white are hard to beat when you want to troll deeper with some flash. Fish just respond to them and always have, especially big fish.


Mepps Spinners in just about any size seem to attract fish on days when nothing else will work. That being said, they were always my Dad's favorite lure and he used them almost exclusively. Mepps with bucktails for trailers bring big pike in too!

There's a handful of terminal tackle and tools that you should have in your tackle box or pack. That brings to mind what you are going to carry all of this stuff in. Flat Plano boxes work well and fit in stowaway packs under the canoe seat or hang from the thwarts. Some soft tackle carriers fit in portage packs easily. Taking your fully outfitted (and often large) favorite tackle box isn't recommended.

Terminal tackle needs include: non-lead sinkers, slip bobbers and stops, plain shaft or octopus hooks (sizes 6 and 4), leaders (stainless or black metal), snaps and swivels.

Extra line is good to have as we've already noted. A good pair of needle nose pliers, a stringer, a net (collapsible) and a sharpened filet knife round out your list of necessary Tools.

As a postscript I always take along a favorite lure for walleye fishing off the campsite. This is a killer lure, that is really just a hook, spinner and float. Made by JB LURES it is the little known, but highly effective WINKUM Spin-N-Float. Just tie on a swivel and snap to the end of your line, put a heavier split shot for weight before the swivel, slip the loop on this rig onto your snap and rig a minnow, leech, worm, gulp artificial bait or twisty tail on the #4 octopus hook and you are ready for action. Upon casting it out, the weight sinks, the float raises your bait up off the ground and the spinner flashes around like a one-eyed wounded bait fish. You'll have time to feel your line being taken and see the end of your rod being yanked down before you set the hook!

NOTE ON COLORS and PRESENTATION Popular color combinations are chartreuse, pink, clown, perch and firetiger along with blue and silver shad. Black is a surprisingly effective color for jigs and plastics as well. As always, the most natural presentation you can rig will always bring the best results. Simple knots on a plain hook with a worm and a split shot a foot or two up will produce fish without being fancy when you fish off of the bottom. Tie your artificial baits on to "swim" naturally and retrieve them as such and you will do better. Look for sunken trees, rocks and structure when fishing for bass and weed beds for pike. Walleyes like points and structure transitions on the lake bottoms most.

Lure Lock'r. Keep those hooks from snagging and keep your favorite lure ready to go on your rod without tangling.  Don't leave home without them!  Lure Lock'rs Here.

RODS and REELS. We sell a great and affordable (less than $35 for rod and reel) combination from Okuma called the Finchaser Combo here at Piragis in Ely. If you want to leave your expensive rod at home because you don't want to chance a snap in the wilderness with portages, trees and snags, you can't do much better than these rods and they'll be a step (way up) for the kids or company to use when you get home.

Why Non-Lead? Common Loons gobble up lead jigs, sinkers and split shot and as a result die from lead poisoning. We are committed to keeping our State Birds happy and healthy.


Fishing with Kids: Read this Blog Post specifically written about fishing with kids 

Tim Stouffer


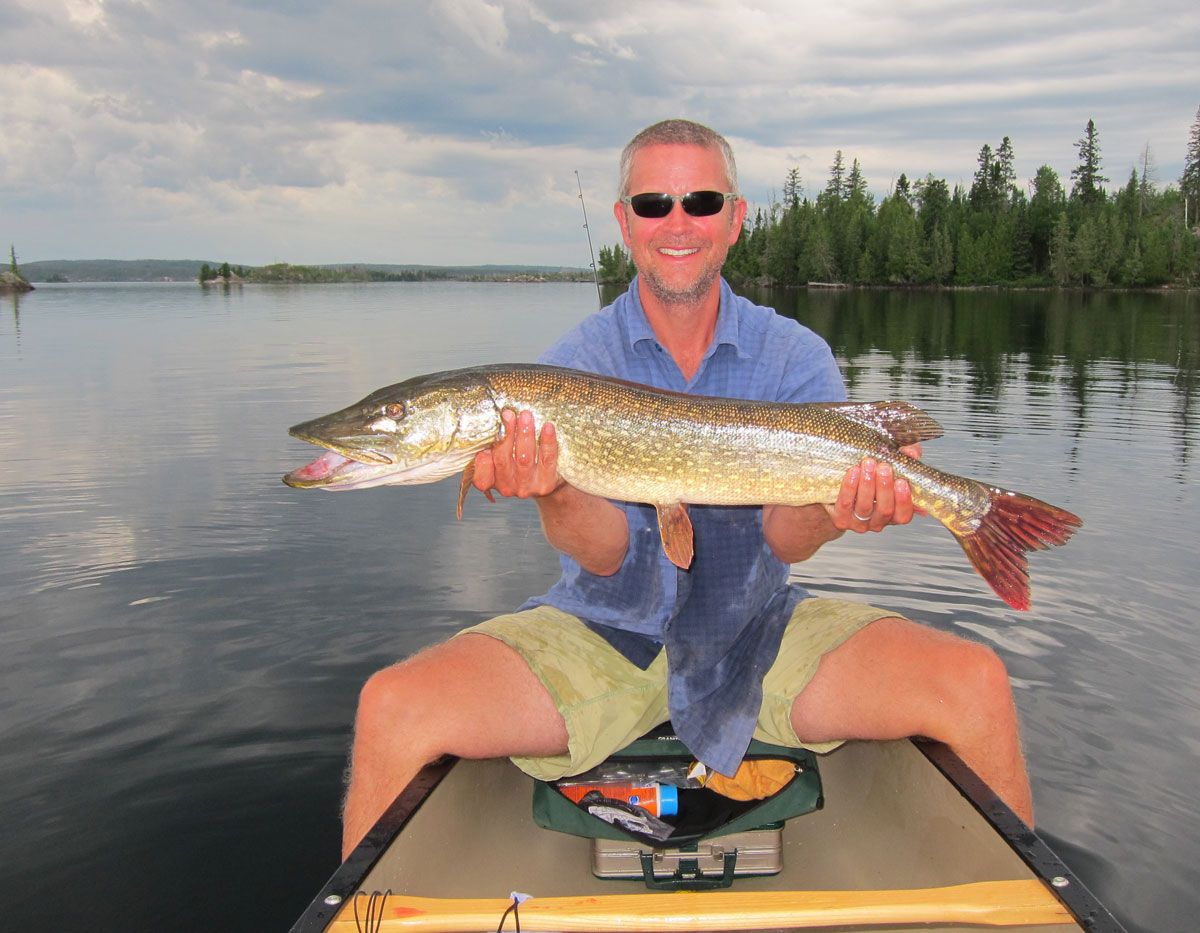
One of our Canoe Trip Clients submitted this photo of a Boundary Waters Northern Pike

BLOG 46. Wilderness Signaling Devices

WILDERNESS SIGNALING DEVICES

by Cliff Jacobson

In June, 1967, my friend, John Orr and I made our annual pilgrimage to the Boundary Waters Canoe Area of Minnesota.  Along a portage, we met a group of teenagers who were carrying a 15 year old girl on an improvised stretcher.
           
She said she had a “stomach ache” and had taken Tums and Pepto Bismol, but they didn’t  help.  When John--a football coach--gently touched her abdomen, she shrieked in pain.  He diagnosed appendicitis and suggested we evacuate her immediately.
           
Then, a miracle!  As we were loading her into a canoe, a forest service fire plane appeared on the horizon (really!).  I whipped out my Silva compass and luckily, the mirror flashed the pilot’s eye.  He saw our frantic waves and settled on to the lake. Then, he flew the girl to Grand Marais, where her appendix was removed without complication.

This was the only time I have signaled for help in a medical emergency.  But I have used signals for other reasons.  Here’s what I carry in my kit:
L to R: Iridium Satellite phone, VHF Aircraft Radio, CB radio, Orange Smoke
ORANGE SMOKE DISTRESS SIGNALS
These burn for 50 seconds or more and produce bellows of thick orange smoke which, on a clear day, can be seen for miles.  I have used orange smoke’s twice, and each time, they caught the pilot’s eye.    Every marina has them.

EMERGENCY SIGNALING MIRROR (HELIOGRAPH)
It is very difficult to precisely flash an object with a standard mirror like the one on an Orienteering compass.  I bring a military (ESM/1) signal mirror, which has an aiming cross in the center.

WHISTLE
You may not hear a whistle above the roar of rapids--that’s why you should know the official hand (safety) signals.  But a whistle works if you wander off a bush-whacked portage trail and become confused. Pea-less type whistles like the Fox 40, which work when flooded, are best.

COLOR COUNTS!
Choose brightly-colored canoes, packs, tents and clothing that can be seen from an airplane!


VHF TRANSCEIVER (JD200 Tranceiver/Sporty’s Pilot Shop)
An aircraft you can see is probably within ten miles of you—close enough to be reached on a hand-held VHF aircraft transceiver. The typical VHF radio with a 15 mile range allows about five minutes of talk time at typical float plane speeds.  As a courtesy, most bush pilots will circle and keep you in range until the conversation is done.  But high flying jets won’t change course, so you better talk fast.  One of my greatest thrills was getting weather conditions from a passing Calm Air passenger jet.  We talked for about 20 seconds. In a life-threatening situation you may broadcast on the restricted emergency frequency (121.5 megahertz), which all pilots monitor.  But for other concerns you must stick with the frequencies that are assigned to the charter air companies.  Be aware, that transmitting without an FCC license isn’t strictly legal!  In the bush, however—and given the short range of hand-held transceivers--everyone looks the other way.  Indeed, most charter air services are pleased that you have a radio.
 Note:  You must have an aircraft model VHF radio to talk to pilots.  A  marine band VHF radio won’t work.  Aircraft models are much more expensive than marine radios and are generally available only from pilot shops.

CB RADIO
If you charter a power boat on Hudson Bay or one of the big Canadian lakes, you’ll want a CB radio so you can communicate with the captain.   Naturally, you must know the channel of operation before you call.
GPS
When we reached the complex delta at the mouth of the Tha-anne River on Hudson Bay, I called my charter boat captain on my CB radio. 

He said, “Better hurry—tide goes out in 30 minutes!”

I punched his position into my GPS.  Twenty minutes later, the white fishing boat came into view.  When time is short, or bad weather threatens, a confident course can make a difference!
SPOT Satellite Messenger
SPOT and DeLORME InREACH
These satellite messengers are lightweight, compact, waterproof and—if the weather cooperates—reliable.  A button push will initiate search-and-rescue operations. The basic SPOT allows you to send three prewritten messages and your GPS location/tracking to your contacts via text and/or e-mail. More advanced SPOT units, and the DeLorme inReach GPS locator allow you to send text/eMail messages through your smart phone. A subscription plan is required.

I prefer the basic SPOT which uses AA batteries. Satellite texting through your smart phone makes sense only if you have a way to keep your cell phone charged on a long trip—and if you can afford the pricey subscription plan.
 
DeLorme inReach with PN-60 GPS


SATELLITE PHONE
If you’re going where help is an airplane ride away, a satellite phone is the way to go. Satellite phones operate just like regular phones, except that calls must be dialed in international mode. I’ve used my sat phone many times on canoe trips and it always been reliable.  Rental phones, however, can be troublesome because the batteries have been recharged so many times.  Every failure-to-function I’ve observed has been the result of batteries that won’t hold a charge.  Rental phones should come with an extra battery AND a solar charging unit!

Cliff Jacobson
www.cliff-jacobson.com


Monday, February 11, 2013

BLOG 38. Top Ten Camping Items

BLOG. TEN TOP CAMPING ITEMS!
by
Cliff Jacobson

Newcomers to camping  are often put off by the all the things they “think they need” to have a good time.  Frankly, you can get by with very little, especially if you are an expert and know what you’re doing. Witness the tales of mountain men like Jim Bridger and Kit Carson who traveled desolate country for weeks with only a few well-chosen tools. The key here is well-chosen. These men knew what they were doing!  

Am I suggesting that you forgo essentials to save weight, space and dollars?  No!  George Washington Sears, who wrote under the pen name of “Nessmuk” in the early part of this century, wrote: “We come to the wilderness to smooth it.  Life at home is rough enough”.

If you have the right gear—and know how to use it—you will always (yes, always!) be warm, dry and in command, whether you’re camping out of your car or tent at a public camp ground, or hiking in the mountains or desert or canoeing in Canada. The important thing is to realize that “skills are much more important than things”.  So best not to start wildly buying stuff until you’ve identified what you really need.  A few good books on camping will get you started right and save you from spending unwisely.

Mountaineering books suggest you always carry these TEN ESSENTIALS when walking outdoors.

1. Map
4. Extra Food and Water

This minimal list is for day trips on marked and beaten paths, not for general camping or where help is an airplane ride away. There’s a whirlwind of gear to confuse you: Here’s what I’d buy first:


Hilliberg Kaitum 3 tent/silicone nylon

BUY THESE THINGS FIRST!

1. A roomy nylon tent. Here’s the minimum I demand:
  • Adequate size: I prefer a two person tent for one; a four person tent for two, etc. You’ll appreciate the extra space when rains come to stay. The slight additional weight and bulk of a larger tent is hardly noticeable.
  • Double walls—a porous inner wall (canopy) to let body-produced moisture out and a waterproof outer wall (fly) to keep rain from getting in. I dislike single-walled tents because the single wall allows rain that gets through pin holes in the fabric to fall on you!
  • A bathtub floor: The floor wraps up the walls of the tent like a bathtub and is sewn to the inner canopy several inches above the ground. There are no perimeter seams at ground level exposed to the weather.
  • Twin doors for good ventilation and for shooing bugs out.
  • The bug netting should be colored black.  Other colors reflect light into your eyes and make it hard to see outside.
  •  
Tip:  Always use a plastic groundcloth inside your tent.  Make the groundsheet a foot larger than the tent all around so it flows up the side-walls a foot.  Now, ground water (rain) that seeps into your tent through worn stitching and fabric won’t drench you.  DO NOT put the plastic groundcloth under the tent floor as recommended by some “experts”.  Flowing ground water will become trapped between the plastic sheet and floor and be pressure wicked by body weight into the sleeping compartment. You’ll really have a sponge party!

2. A comfortable sleeping mattress. I prefer a nylon covered air-foam pad like the popular Exped, NEMO or Thermarest. Make a light wool, polyester or cotton cover for your pad.  The cover will eliminate the sticky feeling of “sleeping skin-against-plastic”, and it will protect the pad from punctures, add warmth and prevent sliding on the slippery tent floor.

3. A rain suit.  Avoid ponchos that dribble through. A two piece nylon rain suit is best. It can be waterproof/breathable Gore-tex® or coated nylon. 

Tip: Don’t use your rain coat for protection from wind.  Any garment you wear constantly will eventually develop holes that will let rain in. Save your rain coat for rain! Wear an unlined breathable nylon shell to stop wind.

4. Suitable clothing. Wool rules, followed by nylon and polyester.  Cotton is suitable only in July heat.  Note: synthetics don’t have as wide a temperature comfort range as wool, and they are less durable. If you want to go first class, check out the itch-free pure merino woolens by Ice-Breaker®, Smartwool® and KLAR Ullfrotte®.  They are awesome! Don’t leave home without sunglasses, sunscreen and bug dope. Bring leather gloves so you can safely feed the fire and handle hot pots.

5. Proper footwear.  You don’t need fancy hiking boots for general trail walking.  Tennis shoes work fine if you wear pure wool socks inside. Tip: Buy your shoes a half size larger than your daily work pair and wear two pair of socks—one medium weight, one ultra-light liner pair—inside.  Wear the liners inside out (seams away from skin) to prevent blisters from developing along the seams.
Cliff cooking. Primus Omnifuel stove.  Note cozy band on pot

6. Camp stove: White gas (naptha), propane or butane, your call.
Tip: Gasoline stoves burn hottest and are least expensive to operate. Propane stoves run hot but they’re heavy and bulky. Butane stoves are compact and light but they are expensive to operate and their fuel containers aren’t available everywhere.

7. Sturdy knife: fixed blade or folder.  If a folder, it should have a locking blade. I can’t imagine going camping without a knife!
Essential tools

8. A folding saw and hand axe. The saw is needed to cut small logs into short lengths for splitting; the hatchet is used to split the cut pieces into kindling size fire wood. Even wood purchased at campgrounds may need splitting to get at the dry heartwood inside, especially if the wood is damp.
           
9. Cook-set:  Dedicated camping pots are nice, but castoffs from home will work fine. Pots should all have covers. A tea kettle that can be handled with one hand is handier than a coffee pot that requires two hands to pour. 

10. Day pack: A light nylon day pack or fanny pack.  It should minimally include the ten essentials.

11. A welcome addition!  A 10 x 12 foot or larger nylon tarp, with pole(s), stakes and cord for rigging. Erect the tarp before you pitch your tent so you’ll have a dry place to work and play if rain begins. Some tarps have bug netting attached—an extra cost option that’s worth its bulk if you camp where insects are a concern. Be sure to bring nylon parachute cord  (I suggest 100 feet) and stakes to rig your tarp.  
A tarp can save the day!  This is a Cooke Custom Sewing "tundra tarp"

            Tip: If you’re going off the beaten path, choose a bright colored tarp that can be seen in an emergency. My favorites are those made by Cooke Custom Sewing (www.cookecustomsewing.com in Lino Lakes, Minnesota.


THINGS YOU DON’T NEED RIGHT NOW

Stick with camping for awhile and you’ll have everything (and more!) listed below.  But at the start, it’s better to spend your money on things you really need, and leave luxuries for last.  Every expert camper has his or her ideas on what is least important.  Here’s mine:


  1. First aid kit: Serious first-aid kits are for “serious trips” off the beaten path. The best ones are expensive.  Colin Fletcher, one of North America’s best known long distance hikers, and author of THE COMPLETE WALKER, suggests a simple first-aid kit that will fit into a zipper lock plastic bag. You probably have everything you need in your medicine cabinet.

  1. GPS: Nice but not essential.  Few people who own GPS units know how to use them.  Master map and compass navigation before you buy a GPS.

  1. An LED headlamp is nice, but the  flashlight you already own will also light up the night. 

  1. Stainless-steel or titanium drinking mug:  Prices range to more than 30 dollars! An inexpensive double-walled plastic mug with fitted cover (the kind you find at gas stations) works as well Tip: You won’t lose your cup cover if you leash it (fishing line works well) to the handle. Choose a brightly colored cup you can see amidst the forest green.
Your mug should have a cover and leash

  1. Stainless steel or aluminum water bottle: A plastic soda bottle is lighter and works as well. 

  1. Specialized camp clothing:  Gore-tex® and merino wool clothes are wonderful, if you can afford them.  If you can’t, you’ll do fine with discount store nylon, fleece and polyester. 

  1. Entertainment/toys: Most people go camping to get away from the crowds and to experience solitude and the delicious sights and smells that go with living outdoors. The wilderness provides all the entertainment you need. If you want a full (real) camping experience, leave games at home. Instead, walk in the woods, climb the hills, sit by the stream and ponder the beauty of nature. Trust me; you won’t be bored!

  1. Camping with children? Give children some cord, a note-book and pencil, a simple compass and magnifying glass (and a whistle for emergencies) and turn them loose to explore near camp. At day’s end, ask them what they learned. You will be pleasantly surprised. This is how native Americans taught their children.

XXX


Followers