Pages

Friday, November 29, 2013

BLOG 59. How to Winterize Your Canoe or Kayak


BLOG 59. HOW TO WINTERIZE YOUR CANOE OR KAYAK
by Cliff Jacobson

I live on the Wisconsin-Minnesota border where winter stops boating cold.  Snow arrives in late October and hangs around till May or when insanity sets in, whichever comes first.  By Thanksgiving, even die-hard paddlers have garaged their canoes and waxed their skis!
           
Spring often comes suddenly to Vikingland, and serious paddlers want to be prepared for the first nice day.  So, they repair and winterize their boats before they store them away.   Everyone has an annual ritual.  Here's mine:

CLEAN OUT THE GOOBERS
Wash the hull inside and out.  Flush under the decks of canoes, and deep into the ends of kayaks.  You won't believe how much debris accumulates there.  Gummy tree sap and ground-in dirt can be safely removed with a wet sponge and "Soft-Scrub®" kitchen cleaner. I use Star-brite®. a commercial hull cleaner for serious stains and scum lines.

REPAIR GEL-COAT
It's easier to repair chips on fiberglass/Kevlar canoes if you don't follow the canoe maker's instructions.  Gel-coat is runny and difficult to get a good color match.  Here's my method:

            Materials:  White polyester putty (available at marinas) or auto body bondo.  For the strongest repair, mix colloidal silica or strands of chopped fiberglass with epoxy.  Important: use boat-building epoxy, not quick-cure hardware store stuff. Sixty and 100 grit sandpaper, and 200 grit wet-dry finishing paper; color-matched auto acrylic spray paint, paste wax and pumice. Note: gel-coat is purely cosmetic—it adds no strength to the laminate, so it probably doesn’t matter what you use—that is, as long as the resin sticks to your canoe. I recommend epoxy because it is compatible with epoxy, vinylester and polyester hulls.

ROYALEX
Tears and gouges in Royalex are easily repaired with epoxy.  You’ll get a stronger, longer lasting repair if you sand off the thin vinyl layer that covers the ABS substrate before you begin.  Then, just fill in the damaged area with epoxy resin thickened with micro-baloons or other thickener.  When the resin is rock-hard, sand it smooth then spray paint to match the hull.  Use fiberglass and/or Kevlar cloth to repair major damage. Epoxy degrades in ultra violet light so apply 303 Protectant to your finished work.

Procedure:
            1. Pick out the shards of damaged gel coat with the blade of a knife.
            2.  Catalyze polyester putty (use extra MEKP to produce a hot mix) and work the peanut-butter-thick mix into the break to over-flowing.  Thicken epoxy resin with colloidal silica.  Caution: be sure to wear a mask when mixing colloidal silica.  The fine particles go deep into the lungs!
            3.  When the putty is firm, slice off the excess with a knife.  Allow the remainder to cure completely then sand it level with progressive grits of sandpaper.  Finish to silky smoothness with 400 grit wet sandpaper.
            4.  Spray paint the patch with matching auto acrylic.  When the paint has dried, use paste wax and pumice to blend the paint to match the hull.  If you have a natural gold Kevlar canoe (or one whose color you can't match), mask a short artificial water-line along the stem (photo) and paint the masked area an attractive color.
Note flat-black artificial waterline on this solo canoe.  Damage to the stem is easily repaired by filling the gouge with thickened epoxy, then spray-painting.  Don't like black? Choose any color you like.
APPLY ULTRA-VIOLET PROTECTANT
It’s wise to apply an ultra-violet inhibitor (I recommend 303 Protectant®) to the hull at the start of the season and again before you store it away. 303 hides light scratches--gives a slick new look!--and prevents sun damage.  To hide deep scratches, apply Penetrol® (available at hardware stores) and buff with a cotton rag. Afterwards, apply a finish coat of 303 Protectant.

TORQUE THE TRIM          
Canoes flex as you paddle; screws work loose and thwarts and seats crack.  The vibrations of car-topping also have an effect.  Nuts and bolts should be tightened at least once a season, and again before winter storage.  
           
Tip: owners of wood-trimmed Royalex canoes are advised to remove the gunnels (near the decks) of canoes that will be stored in sub-freezing weather—uneven rates of material expansion cause Royalex to crack.
           
Here’s a better plan: Unscrew the wood the rails about two feet back from each end, then slightly enlarge the screw holes in the Royalex (just the Royalex!).  Then, screw the rails back in place. The Royalex will shrink when it gets cold but it won’t crack because the enlarged screw holes won’t pressure the screws. Another option is to horizontally slot the screw holes in the Royalex.  You need only enlarge or slot the holes near the ends; no need to do the whole boat.  Note: By the end of 2014, Royalex will be no longer available (the sole maker went out-of-business).  Take good care of your Royalex canoe--it is sure to increase in value during the coming years!

SUNLIGHT AND MOISTURE
Ultraviolet light is a killer (aluminum canoes are the exception), so store your boat in a weather-protected area out of the sun.  If you use a garage, be wary of windows that project a focused beam of light on to the hull.  If you must store your boat in a light path, apply an ultraviolet protectant to the hull or cover the sun-exposed areas with a cotton sheet.  Do not place black plastic against the hull;  It will encourage condensation and cause the gel-coat to discolor.
           
Winterizing a canoe or kayak is mostly common sense: clean out debris, wash and polish the hull, repair damage, apply an ultraviolet protectant to plastics, oil or varnish the woodwork, tighten bolts and store your treasure in a weather-protected, well-ventilated area, out of reach of small animals.  Get your boat ready before the snow flies and you'll be ready to climb aboard when the rivers run again.

XXX
           

Saturday, November 16, 2013

BLOG 58. Best Little Boating Stream in Wisconsin

BLOG 58.  Best little boating stream in Wisconsin  
by Cliff Jacobson
www.cliff-jacobson.com
Kinnikinnic River 
Between the fury of big rapids and the hushed quiet of backwaters, there’s a gentle mix of bubbling waters that challenge but do not intimidate—where pristine beauty, violet-sweet aromas and absolute solitude ravish the soul.

The Kinnikinnic River, in River Falls, Wisconsin is such a place.

The Kinni is hardly an undiscovered river.  A 20 minute drive from St. Paul brings you to the dam and old grist mill that marks its beginning—a reminder of when this was a “working” river.  The eroded spillway remains, creating a small impoundment where those who don’t understand the ways of running water may enjoy a flat-water float.
 
"Put in" on the Kinni--just below the dam in River Falls
Three miles below the dam there is another sign of flourishing times—a once proud brick kiln.  A tattered trail runs from the dam to the kiln—an easy hour’s walk.

A nationally revered trout stream, the Kinni is generally canoeable from March through November. Even during a summer drought there’s usually enough water to float a canoe.  But a week of rain really brings the river to life. The first rapid—a gentle Class I drop, begins just below the put-in by the dam. From here, the water grades from riffles to Class II when the water is high.  Nearly all of the approximate eight mile run contains riffles or small rapids, all of which are easily canoeable by those who have basic river paddling skills.  Rocks, brush piles and sweepers dot the stream at every turn, requiring constant maneuvering. Every inch of the route is entertaining. Expect to drag some shallows when the water is low; when it is high, the route can be challenging.

The river moves fast, but not dangerously so. Occasional pools encourage a full paddle stroke but the channel is seldom more than two feet deep.  Scratches and gouges are routine—the most polished paddlers won’t get downriver without scraping.
 
Typical scenery along the Kinni
So what is the attraction of this shallow, narrow boat-eating stream? It’s not the lure of big rapids, for there are none. Nor is it the joy of family togetherness; the Kinni is too shallow to encourage the weight of coolers, kids and dogs. Slick, fast canoes that don’t turn quickly are a handful on this stream. And the wicked little drops, sharp rocks and usually cold water discourage swimmers and tubers.  This leaves the river to trout fishermen and paddlers in small, short canoes and river kayaks. The Kinni is selective!

Except for the dam at its headwaters and the weed-choked brickyard there is no development of any sort along the way.  Limestone bluffs with natural springs bolt skyward along the route and create the impression of mystical canyons.  Often, it’s mid-day before the penetrating mist burns away and reveals the full light of the sun. Paddling the Kinni at first light is a magical experience.
 
The "put-in" on the Kinni--just below the dam
The put-in is Glen Park in River Falls, Wisconsin.  A 200 yard walk down a well-used trail brings you to the base of the dam and start of the trip. Take-out is at Kinnikinnic State Park (you’ll need a Wisconsin state park sticker) at the junction of hwy F and FF.  Or, continue on to the St. Croix River and take out at Prescott, Wisconsin. Bring your own boats or rent them from Kinni Creek Lodge in River Falls (www.kinnicreek.com). The lodge offers shuttle service to Kinnikinnic State Park and Prescott beach.

You don’t need a dry suit or float bag to float the Kinni. You do need a light responsive canoe or kayak and at least three hours time. There’s so much to see along the Kinni that it’s best to plan a full day.

Cliff Jacobson
www.cliffcanoe.com

XXX


Important Dates: 2014 BWCA Permit Reservation Process

For the best chance to get the permit of your choice, it is important to start planning early.  Now is a great time to grab your BWCA overview map and start dreaming of your 2014 trip.  If you don't have an overview map, contact us and we will send you one.  Follow this link to request Trip Planning Information.

Important Dates to Remember:
Permits for Fall Lake and Moose Lake can be obtained through a lottery. The lottery is open from 9:00am Central Time on December 17, 2013 to 9:00pm Central Time on January 14, 2014. After the lottery has run, all remaining Moose Lake and Fall Lake permits will be available on a first-come-first-served basis starting at 9:00am Central Time on January 29, 2014.

All other permits can obtained on a first-come-first-served basis beginning 9:00am Central Time on January 29, 2014.

Call us at 800-223-6565 and we will walk you through the permitting process and help you choose the route that best fits your group.

Happy Planning!

Sunday, November 10, 2013

#27 to #30 Loop: 32-38 Miles (4-7 days)

Difficulty: Moderate

Points of Interest: Pagami Creek Fire, Lake Trout, Fishdance Lake Pictograph, Disappointment Mountain

Description: This route begins on Snowbank Lake.  There are a couple of different ways to get off of Snowbank, but since it is such a large body of water, I often recommend making the shortest possible crossing and heading directly into Parent Lake.  From Parent, you will continue to Disappointment Lake, a great spot for basecamping if you don't feel like doing the whole loop.  Travelling north, you will continue through a number of small lakes with nice views of Disappointment Mountain to the south (really more of a large hill than a mountain).  Jordan Lake is typically a favorite in this area and has some really nice campsites.  Continuing on, you will pass Ima Lake, on to Hatchet Lake, then to Thomas.  Thomas is a great spot for a layover day if you have the time built in.  

Take a day trip north to Fraser Lake.  The narrows between Thomas and Fraser are really neat, and they both have Lake Trout in them.  Moving on, if you want to extend the route head over to Alice, and if you get a chance head a little farther south and check out the pictograph on Fishdance Lake.  Otherwise, head straight south into Kiana Lake.  Continue on to Insula Lake, and stay on one of its many nice campsites--some even have beaches.  The Pagami Creek fire will start to become noticeable about half way down Insula.  It is interesting to see how different the forest looks after a wildfire, and how quickly it regenerates.  Moving out of Insula and into Hudson Lake, continue heading west on the Kawishiwi River (the water flows west).  Keep traveling through Lake Four, Three, Two, and eventually exiting at the Lake One access point.

**Note:  This is also a very nice route in reverse order, starting at Lake One.**

Choose this route if you are looking for a moderately difficult travelling trip, great fishing, a variety of rivers and lakes, and if you would like to explore part of the Pagami Creek fire.

We want your feedback!
We would love to hear what you think about this route. Have you been in this area before? What is your favorite part of this route? What is your favorite lake? Do you have a trip story you would like to share? Do you have any questions? Is this something you think you might try? Please comment below and join the conversation.

Call Drew and Adam at 800-223-6565 for all of your routing needs. 

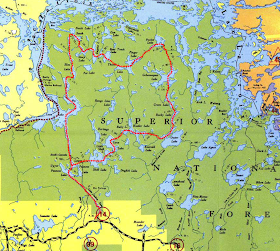
#14 P Loop: 40-45 Miles (5-8 days)

Difficulty: Challenging

Points of Interest: Devil's Cascade, Solitude, Rocky Lake pictographs, Loon Bay beaches

Description: This route begins on the Little Indian Sioux River and takes you past Devil's Cascade, a beautiful cascade flowing north out of Lower Pauness Lake. From here you continue past a few sandy beaches in Loon Bay to the small interior lakes south of Lac La Croix. These lakes are separated by some difficult portages with steep hills, but the solitude gained can be worth the effort--most lakes only have one or two campsites, and you often find yourself with a lake all to yourself. Continuing on, you will pass through a number of gorgeous lakes (Pocket Lake often being a favorite). At Rocky Lake, take your time and look for the set of pictographs on the west side of the lake. You will turn west once you hit Oyster Lake. On the portage from Oyster to Hustler, you will have to traverse a beaver pond (often best to paddle it). Enjoy the scenic beauty as you continue back to your point of entry, and look for the pair of swans that have been hanging out on Lower Pauness for the past couple of seasons.

Choose this route if you are looking for great wildlife habitat; a variety of paddling rivers, creeks, and lakes; a challenge; and solitude.

We want your feedback!
We would love to hear what you think about this route.  Have you been in this area before?  What is your favorite part of this route?  What is your favorite lake?  Do you have a trip story you would like to share?  Do you have any questions?   Is this something you think you might try?  Please comment below and join the conversation.

Call Drew or Adam at 800-223-6565 for all of your routing needs.